Imagine yourself sitting looking out at a scenic vista and you say to yourself: Wow, I can’t draw all that. You’re right! It’s impossible to capture every detail of what you see. I personally have a problem simplifying large scenes or subjects. So I ask myself how much time do I have and how much of this scene can I include? So I simplify the subject down to something manageable and compositionally interesting by using a view finder.
If you like to draw outside or en plein air, you too may find using a view finder helpful. A view finder is also useful if you draw still life. The view finder helps frame what you see into a manageable perspective and size. You may have seen some artists and movie makers use their index fingers and thumbs on both hands to form a rectangle they look through; some use their index and second finger to form an L and use that as the reference for framing the picture. If this approach for framing works for you, great! Use it when you are en plein air painting or drawing. However, I find using an actual viewfinder best because I don’t have to put down my writing or painting implement every time I want to refer back to the scene that I am drawing. Below are some tips on using a view finder followed by instructions for making your own homemade view finder. If you have the interest, a few minutes and an old cereal box (or equal) and some super glue, you can have a snazzy, highly portable and usable view finder.
NOTE, I get it, much of this can be done with your camera!! Whenever you take a photo, take a wide-angle and then close-up/zoomed in. Bend down, take it from different angles, horz and vert, move the focal area around using the rule-of-thirds, move the horizon line up and down, click-click-click. Then use the info below to simplify when you have time or are ready to draw or paint this scene. Don’t just take the photo you think is best, use the crop feature later and save a copy, you might want to change the mood or story of a painting.
To use the View Finder.
- First adjust the hole opening on the View Finder (VF) to the size of your drawing paper or desired image size. It doesn’t have to be perfect but you know me…. To do this, put your paper down in front of you (e.g. on your lap). Position the VF between your eye and the paper. Align the fixed side of the VF’s opening to match the right side and size of the paper. This means moving it up and down over the paper. Now move the slide on the VF to match the other dimension of your paper. This all should take you 10 seconds. When you get it, use a pencil to mark on the VF the position of the slide and the size of your paper so you have it for next time. Wheeew!
- Now close one eye and look out at your subject and move it up, down, in, out, (near your eye and far away). Find something that looks interesting!
- Once you have your subject or scene, keep holding the view finder in place and study what you see through it.
- Things to consider. I won’t get too deep into composition but think:
- What will be your focal area, what in this scene is most important to you or attracted you to this photo or location?
- Don’t put the focal area in the center. Put it off center.
- Don’t put the horizon line in the center. Etc. etc.
- Now loosely sketch the whole scene’s major shapes, very lightly to lay out what you want. This loose, scribble, technique is often referred to gestural drawing. (if you want to know more about this technique of quick layout, let me know and I will tell you the next time I do a drawing class)
- Once you have laid out what you see through the VF, your simplified subject in loose gestural lines, (scribbles), you can put the VF away.
- Now finish your drawing by adding as much detail and color as you desire.
Using a view finder may help you focus on something small and manageable and interesting. It really doesn’t take any space in your travel paint kit either. Remember if you are going to take time to make one, make many, and give them to your friends!
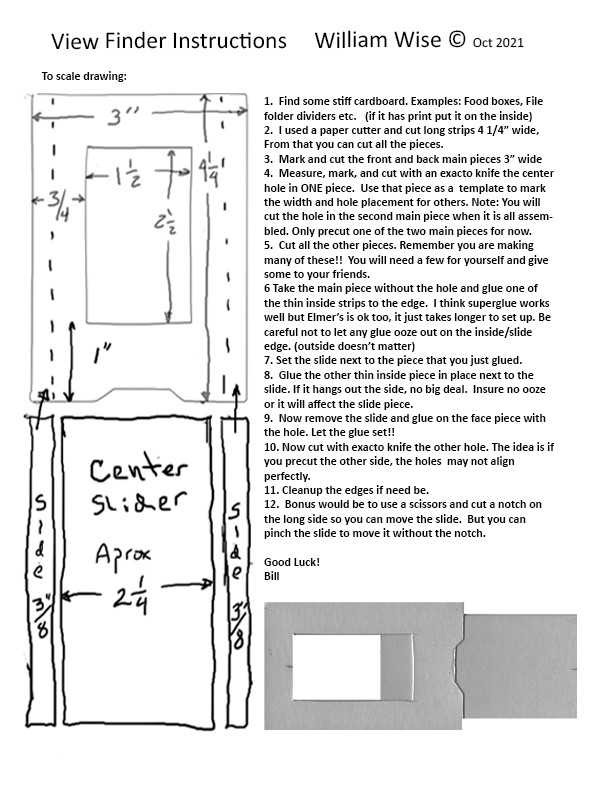
Instructions for Making a View Finder.

If you want to print this, open it and save it to your desktop. .Click to open.
Last updated: Jun 2024 added use of camera, Oct 2021 Made to scale and vertical. Apr ’17 minor words, Aug ’16, D’s edits