How can you pose and take the perfect painting reference picture quickly?
One EASY start is to say to the person/model, “mirror me”! “I want to make you look the best I can”. Then demonstrate, turn sideways, put the knee in, hands on hip, head tilt, lean in, etc… Posing Tips For Women, https://www.youtube.com/watch?v=gWx7SBvmFZE Jerry Ghionis
The following is a simple formula to take pictures efficiently and very quickly. I assume you are not a pro photographer but still want images to paint. It isn’t about the camera or clarity of the photo. (It is of course but you are an artist and can correct some deficiencies) This article is about getting a GOOD reference image you can paint!
This first part is about lighting and you taking a lot of photos! The second part is how to make the photos you take more interesting.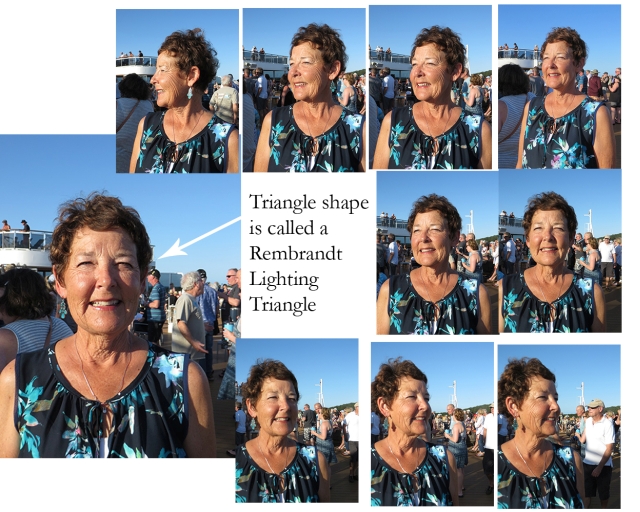
High contrast photos. (Note: The above photos are in very bright sunlight with no reflected light. These example photos show the steps and are more of a place holder until I put a better series in its place) The expressions are not telling a story but I could paint “ONE of them”. That is all you are after, one excellent shot, and delete the rest!) Which is your favorite?
Ask a friend to pose for you, or have them take photos of you.
The photographer should stand three to four feet from the subject of the picture. The subject should be at an angle, not straight-on. Have the sun on the front of the subject. Have the subject begin their pose with their head turned towards the left. Then have them turn their head and stop, in short increments, as the photographer takes pictures. The goal is to get multiple photos at a variety of angles as they turn their head to the right. (see photo example above).
Try this same process but change the angle the subject is standing in the sun or have their back to the sun, etc.
The whole process might take 5-10 minutes or less. Once you start clicking you will get the hang of it, have fun!! Look for interesting shadows.
One important thing to look for is having a little patch/triangle of light under the eye that is on the darker side or in shadow. This is called “Rembrandt Lighting” (google it for tons of images!!) It is important because it illuminates the other eye vs. being in dark shadow… (There is another similar called “Loop Lighting” that has the light come around the nose and on the lip.) Look for this triangle and depending on the angle of the sun you might require your subject’s head to be at different angles. See below for other key words to search on for lighting. Good luck!
Tell a story and/or show an emotion. Now you have the hang of taking a series of photos and changing the lighting. Your sitter is more relaxed having a camera pointed at them! (Back in the film days this was very expensive)
Tell a Story: Wear something or do something that tells a story. Trying wearing a scarf, then different hats, then a prop….etc. Make the viewer/photo ask “What just happened?” What will happen next, what is she thinking about, where is she looking…?”
Capture an emotion Quite and/or with Energy: Interesting shots show emotion. Think of an expression like: Quiet, Interest, curiosity, concern, surprise, wonderment, love, lonely, Etc. More subdued images are a bit more classic and easier to look at then overly happy and ones with teeth or grins that just say “look at Me”. Expressions with the mouth are changeling to paint. Change the tilt of the head, eyebrows, and position of the eyes. Hands are VERY expressive. Put them on the face or in the hair, or holding something. Lips closed looks nice and easier to paint than teeth. One thing to avoid are the pupils on the far edges of the eyes. Keep them more to the center, again easier to paint. Get it???!!!
In saying all that I Love doing my musicians belting out a song!! Such rich expressions!. Don’t take only one type of photo when you have someone posing. Go crazy have them show every expression you can think of. Excitement, joy, fun, WOW, etc. Click, click, click, click….
Yes, Click, click, click, click, then delete ALL the bad ones. You know any blurry, blinks, and any shots that are non complementary and you know you will NEVER paint. They take space and you don’t want them hanging around. You will have many outstanding shots you won’t be able to pick from.
One more thing, (OK, there are a million more things!) Don’t get too close and crop too tight, you will crop later. Too close you will be in the “wide-angle” portion of your lens. You will run the risk of the face having some fish-eye lens distortion. (Barrel Distortion causes noses to be large and small foreheads…) Taking them back a bit allows you an image you could paint it in portrait or landscape orientation.
Good luck.
Bill
Google search:
“High Key Portrait Lighting flattering”
“Rembrandt lighting”
“Loop lighting”
“Butterfly lighting”
https://bidunart.com/what-is-butterfly-lighting-and-how-to-use-it-in-photography/
Butterfly lighting highlights the main facial features and adds a beautiful shadow under the chin, which adds a slimming effect.
Butterfly Lighting – also called Paramount Lighting – is the type of light that is named after Paramount movie studio of old Hollywood. It is also known as the butterfly, Hollywood, or glamour light.
This is a soft and feminine key light directed right at the model’s face from an angle above. The light allows model’s skin to be idealized as much as possible. This lighting setup is often used in Fine Art Portrait Photography.
Butterfly light creates the same flattering features as flat lighting but includes shadows underneath the nose and chin. You can use a reflector from below as a fill light in the chin area.
Butterfly lighting is commonly used in beauty shots and high-end portraits requiring soft, flattering light like glamour or fashion shoots.
Interesting article other than mine. https://www.picturecorrect.com/tips/10-tips-for-taking-more-interesting-photos/
https://www.pinterest.com/pin/453315518716474208/
This shows a bunch of examples.