Sretching WC paper on frames Nov 2018 ©WilliamWiseArt.com
Click here to download a PDF: Stretching WC paper on frames
A few points to make before we start:
Please note: It seems complicated until you’ve done it once! The first time will be a bit clumsy but then you will understand what size your paper needs to be and how wet is wet enough. Painting WC on stretchers can have the benefits of oil painting in that you don’t need to spend money on mats and frames! $$$ Will you frame this painting? If so the thickness of the sides matters! If it will hang unframed then the thickness is not so important. The back is not really an issue. PAINT THE SIDES AS YOU PAINT THE FRONT. You want the edges to look finished.
Corners are formed on the Top and Bottom sides. Decide whether you will paint Portrait or Landscape.
If you want, the paper could be removed from the stretcher, flattened (ironed), matted, and framed. If left on the stretcher the surface of the watercolor painting will need to be protected from the elements with some product. Google “How to varnish a watercolor”. There are many products and tips.
Before you start! Prime, gesso or varnish the wood frames. Sealing the wood will prevent acid in wood from staining paper.
Supplies:
Staple gun, short staples are fine 1/4 – 5/16 – 3/8. Check that you have plenty and the gun is loaded before you start. You don’t want to reload in the middle.
Scissors. Big flat blade screwdriver to remove staples when needed.
Sheet of plastic to protect working surface and for possibly folding over paper while it’s soaking.
Sponge with water. Big spritz bottle to moisten or keep things moist. Towel /rag.
140# Paper about 5” larger than frame. Measure the thickness + the width of your frame x 2 (Extra paper is not necessary or helpful). The paper should cover the back of stretcher for ease of stapling. Good idea to make a mark on the back side of the paper so you can easily see which side to put the stretcher on.
READY?! Paper expands when wet, it relaxes!
There are lots of options to wet the paper. Spritz with spray bottle, use your sponge to dribble water and spread it around, lightly brush with big SOFT brush, some soak in a tub, but don’t use any pressure spray like on your kitchen sink that might affect the sizing.
Soak until limp (5 min – 10 is good). Be very careful NOT to affect the surface sizing!!! Don’t rub too hard or soak too long!
Center frame on the BACK of the paper.
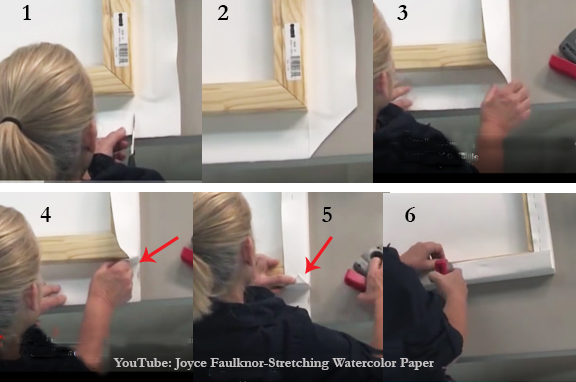
Cut first two corners, (see Joyce Faulknor pictures below). Staple center of first side. 3 or so staples.
Rotate 180 deg, and cut other two corners. Note: You don’t need to pull paper like canvas. It has already expanded and the paper will shrink! Too tight and it may bow the stretchers.
Pull snuggly / firmly. Get the wrinkles out. Staples center of opposite side. You don’t need to staple the center of the ends yet. Right now the two sides are in place and taunt. Depending on the length of the frame, staple several places down to the corners on the first end.
NOW with the sides stapled, fold in and staple the SIDE corners, not the ends yet! (See pictures below for more details on the corners and folding the ends up and over.)
Use plenty of staples, too few and the paper may buckle when dry. Keep the staples spaced nicely and parallel with the sides. Don’t be messy; consider style points if someone looks at the back!!! Remember the first one is for practice; the next one will be perfect!!! Good luck, Bill
Here is one YouTube titled “Stretching Watercolor Paper – 6 Frequently Asked Question” from “The Mine of Watercolor” . He discusses benefits of stretching paper in general.
For materials and instruction on how to finish and protect the surface if not protected by glass, do a YouTube search on “How to varnish a watercolor”
YouTube: Joyce Faulknor-Stretching Watercolor Paper
Joyce shows an easy way to cut and have little bulk on the sides. Very simple and probably the best process! 
1. Carefully cut paper to the corner. This scissor cut edge will be visible.
2. Cut the waste at a diagonal.
3-4. Grab the triangle tab and pull it tight to form the corner.
5. Hold it tight and fold the top and staple. Note: The top fold will be covered and also it’s on the back of the frame, making it less important.
6. When all 4 corners are folded and the sides stapled down, then fold up the top and bottom sides. This is just simply folding the straight piece up and snugly over the side corner folds.
Use plenty of staples so it doesn’t pucker. But don’t be messy; others will see your work!
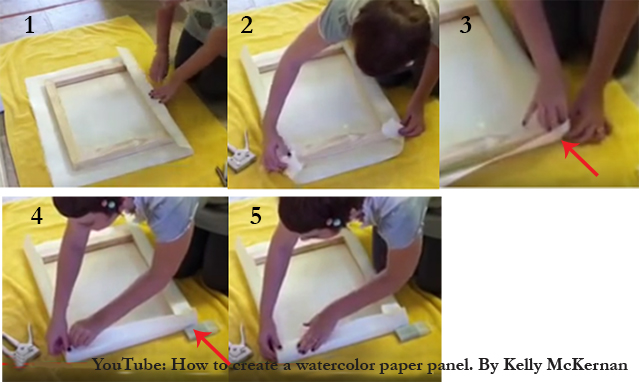
YouTube: How to create a watercolor paper panel. By Kelly McKernan
Kelly folds without cutting the paper. This leaves another layer on the ends. This can be unstapled after the painting is finished. Notice how she folds the paper under instead of the normal “over” to get the hospital corners. This gives the straight edge versus the angled look. Believe me it looks harder than it is.
1. This is portrait format; folds are on the short ends. Fold over and staple first side in center, then pull taunt and staple the other side in the center and finish that side right up to the corners. On this size frame there are no staples on the end before forming the corners.
2-3. She lightly pre-forms the corners. Your full attention must be on the front corner, the corner on the floor. Form that corner tightly and press to crease the paper.
4. After pre-folding one side, held it with that with a block, and finished the fold on the other side.
5. With the front corner tight bring the bottom fold up focusing on keeping that fold straight up-and-down, not at an angle. She tightly formed, pressed and stapled the corner, then did the same on the other corner. With the corners formed she stapled the center evenly. Don’t be messy!
Created: Nov 2018
